Part # PL0172
Dimensions 25" L x 9" W x 5" D
Pureline Replacement DE Filter Grid Element – 48 Sq. Ft. Partial Grid (24")
Compatible with Select DE Pool Filters
Model: PL0172
Quantity: 1 Partial Grid
Why Replace Your DE Grids?
After several years of use, DE grids can become clogged or worn, reducing your filter’s effectiveness. Replacing worn grids helps maintain clean, clear pool water, protects your pump from unnecessary strain, and improves system efficiency.
Product Overview:
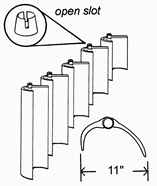
This aftermarket 24" partial DE grid is used as 1 of 8 total grids in many 48 sq. ft. DE filter systems. Constructed with durable materials to support strong water flow and effective dirt capture.
Replacement Notes:
Most 48 sq. ft. DE filters require 7 full grids + 1 partial grid
Designed for compatibility with filters originally equipped with 48 sq. ft. grid sets from American Products®, Pentair®, Hayward®, and Pac-Fab®
Replace every 5 years for best performance
Disclaimer:
All manufacturers’ names, part numbers, model numbers, and trademarks are used for reference only. This aftermarket product is not affiliated with or endorsed by Hayward® or any other OEM.
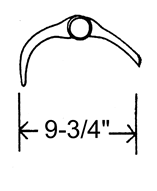
Note: Collar has open slot (2 notches). Length is measured from one end of the grid to the other (collar not included).
Disclaimer:
All manufacturers’ names, brand names, trademarks, images, symbols, descriptions, and part numbers are used herein for reference purposes only.
How do I know which replacement grids I should order?
Reply
Typically, the filter label will contain the filter model and square footage of your grids. If the information on the label can not be read, you can measure the length (top to bottom) of the grid and multiply by 2 to get the square footage. For example: A 12" grid length would mean that the square footage is 24.
Reply
What is the procedure for replacing DE grids? 48 sf
Reply
Sal- Here is a how-to guide that shows you how to replace DE filter grids. http://www.inyopools.com/HowToPage/how_to_replace_de_filter_grids.aspx
Reply
Less than 1 hr
Screwdriver, Pliers
First turn off the pump. Then turn the relief valve located on the top of the DE canister. Then remove the drain plug on the back, bottom of the DE canister. From there, I removed the metal retainer ring that holds the top and bottom shells of my Hayward DE filter. I then removed the top shell, and the entire grid system by lifting on the two points of the manifold that have "life here" printed on it. After removing the entire grid system, I unscrewed the long threaded rod that holds everything together. I carefully placed the grid system up side down and removed each grid. I then replaced each grid making note of the one short grid so as not to place it in the wrong hold. After replacing all 8 grids (one short and seven regular size), I replaced the bottom piece and made sure the grids matched up to the grooves. After ensuring all grids were properly installed and in the correct grooves both on the manifold and the bottom piece, I replaced the threaded rod and with the washer and nut tightened snugly. Do not over tighten the nut. I then carefully placed the entire grid system back into the bottom shell making sure I lined up the PVC pipes. I placed the lid back on, then the retainer ring. Be sure to tighten the retainer ring until the springs touch. Close the relief valve and replace the drain plug. Turn on the pump and add the amount of DE to your skimmer basket port after removing the skimmer. Follow the instructions on how much to add and how to add it.
2 to 4 hrs
Screwdriver, Socket Set, Adjustable Wrench
Shut off electric to pool pump and filter. Relieved air from filter at top of filter. Remove water drain plug at lower back of filter to drain water. Removed band around filter. Take top of filter off. Remove filters from casing of DE filter. Remove top that holds DE filters in place. Remove one filter at a time and replace with new cartridge filter. Put top on that holds filters in place. Put assembly of filter cartridges back into housing. Connect housing with band around filter housing. Replace drain plug. Turn electric on and let filter fill up. Open air valve to let air escape. Add DE filter media to pool. Check for water leaks on filter.
1 to 2 hrs
Wrench Set, Adjustable Wrench
1 0
This is the same procedure for installing the other 7 grids, I'm repeating it here for completeness.
After opening the air relief valve to remove the pressure from the tank, I removed the tank cover. Then I took the grid assembly out of the tank. I disassembled the unit by removing the 5/16" locking nut from the top while holding the 7/16" nut at the bottom with an adjustable wrench. After disposing the old grids and hosing down the residual de from the other parts, with the aid of a video from YouTube, I reassembled the grids in the upright position using a grid guide costing $15 from a local retail store that really made it easy to attach the manifold. Reinstall the locking nut and place the complete grid assembly back into the tank. The whole process was fairly straight forward but took some patience. Most important thing is to replace each grid in the proper order. Total time spent about two hours.


 Replacement DE Set | By Pureline")

 Replacement DE Set | By Pureline")

The Most Helpful Review
15 1
(5 out of 5 stars) De Grids
Reviewed By: vivogram from Bridgeview, Il ()
Pros: exactly what we needed
Cons: none
we looked all over for the parts for our filter. We have had it since 1985! the description off the parts as well as the fast shipping was awesome
Was this review helpful to you?
The Most Recent Reviews
(5 out of 5 stars) Thank you
Reviewed By: Inyo Customer ()
Perfect fit and the video was simple and answered all my questions.
Was this review helpful to you?
1 0
(5 out of 5 stars)
Reviewed By: Inyo Customer ()
Great support. Fast delivery and outstanding product!!!
Was this review helpful to you?
1 0
(5 out of 5 stars)
Reviewed By: Gary B. ()
Actually purchased the entire set of grids - found that 5 of the old grids were also torn/leaking the DE on the bottoms so now I have a spare grid. lineThey work like a charm-re-charged the filter with DE and they are filtering just fine-no leaking of DE back in the pool (that was the first sign that I needed new ones-nothing like adding DE and seeing it come roaring out of the return lines
Was this review helpful to you?
1 0
(5 out of 5 stars) Filter easy to install
Reviewed By: BobPool from St Louis MO ()
Pros: Easy to install
Cons: None
Was this review helpful to you?
1 0
(5 out of 5 stars)
Reviewed By: Steve T. from San Tan Valley, AZ ()
Exact replacement
Was this review helpful to you?
1 0
(4 out of 5 stars) 48 sq ft partial grid 24"
Reviewed By: Ronald B. from park ridge, NJ ()
Pros: quality
installed with larger grids no real problems, hopefully holds up as good or better than the originals
Was this review helpful to you?
1 0
(5 out of 5 stars)
Reviewed By: Dennis A. from Newark, Ca ()
Great product for the price. Inyo Pools saved me money.
Was this review helpful to you?