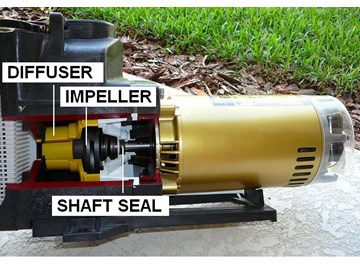
If you see water leaking out of the bottom of the pool pump assembly, it's a good indication that you may have to replace the shaft seal within the motor pump assembly. As shown in the pool pump cut away, the shaft seal is located in the motor pump assembly behind the impeller. Although this description is specific to a Hayward pool pump, many of the steps can apply to other models of pool pumps.
Click Here to View Replacement Pool Pump Parts


Bill Munro Posted: 3/25/2022
My dad has replaced the shaft seal twice and says within four hours it tears apart the seal what is making it heat up he fits it down on the grooves just like it supposed to be and it locks in place but it’s still breaking apart after four hoursReply
InyoPools Product Specialist Matt S. Posted: 3/28/2022
The pump is running dry, or the seal is fouled during installation. If your pump runs dry (no water due to a priming issue), the friction between the two sliding pieces overheats and breaks the shaft seal. A single fingerprint can cause the fouling of a seal on one of the two smooth faces of the shaft seal. Substances like finger oil, lube, or dirt can cause the seal to break down.Reply
Rob Posted: 3/24/2022
Which way does the impeller Eye Seal go? There isn't even one shown on the impeller in this write-up. Mine has one...but nobody seems to know which way it goes. 1. Wide end against the impeller? or 2. Wide end Away from the impeller?Reply
InyoPools Product Specialist Matt S. Posted: 3/25/2022
The pump used in this guide is the Hayward Super Pump, which does not use an impeller ring. Impeller wear rings are not used in all pump designs. The wide part of the wear ring should face away from the impeller.Reply
Eric Andersen Posted: 11/13/2021
Really helpful tutorials, thanks. Trying to fix a leak, I replaced the ceramic shaft seal and 2 other gaskets. There was some leakage that might have reached the bearing. After reassembly, the motor hummed and would not start so I replaced the capacitor. Same thing. The motor is 2 1/2 years old. I can turn impeller by hand. Is it free? Well, it does not continue to spin once it is released…. Any ideas?Reply
InyoPools Product Specialist Matt S. Posted: 11/15/2021
First, I would check the voltage at the terminals. Then, if that passes, I'd check the phase windings. Here is a guide on How To Use a Multimeter to Test a Pool Pump Motor - Winding Resistance.Reply
Eric E. Andersen Posted: 11/15/2021
Thanks. I couldn’t exactly ID the “A” test point, it didn’t look like the point in the tutorial image. I’m testing a UST1102 (configured for 230v) and I see an unused terminal adjacent to L1/L2 and on the opposite side of the ground terminal (green wire). Could that be test point A?Reply
InyoPools Product Specialist Matt S. Posted: 11/16/2021
Which of the terminal boards on the following link most resembles what you have? Motor Parts - A.O. SmithReply
Eric Andersen Posted: 11/17/2021
This one is mine: Terminal Board Assy w/ Voltage Switch - 628401-001. Is test point A the terminal by the voltage switch? Thanks for your patience!Reply
InyoPools Product Specialist Matt S. Posted: 11/17/2021
In Step 6, click the image to enlarge it. The diagram shows the terminal board you are using. Point A is the metal circle above the voltage knob.Reply
Anonymous Posted: 11/17/2021
Thanks, I was able to confirm a dead motor. New motor has been ordered from Inyo!Reply
InyoPools Product Specialist Matt S. Posted: 11/18/2021
That's sad and good news all at the same time. But I'm glad we're were able to help you figure it out.Reply
Richard Posted: 5/30/2021
I replaced old motor with a Hayward 3/4 horse and seal kit. When I replaced motor and turned power on I get a soft hum for about 10 seconds and then it turns off. If I wait it will repeat. Only tried twice, any possible causes? Thanks.Reply
InyoPools Product Specialist Matt S. Posted: 6/4/2021
Did you confirm the motor is set to the correct voltage? Dual voltage motors come preset to accept 230 volts from the factory and need to be switched to 115 volts if necessary.Reply
David Woodcock Posted: 5/20/2021
Thank you Your videos are great...we have told all out gang. Completely rebuilt our pool pump bearings seals and all. Keep up the good work. Note: you could include the rubber seals around the case ?? DavidReply
InyoPools Product Specialist Matt S. Posted: 5/21/2021
Thank you, David. If you ar referring to the pump gaskets, the gaskets are matched to the pump housing and not the motor. So, if you purchase a motor/bearings, you are getting a product that can be used on dozens of different housings. There isn't a universal fit gasket kit, unfortunately.Reply
Mark Posted: 4/19/2021
I purchased a shaft seal SP1500KA seal kit for my Hayward power flo LX any the impeller seems to be frozen on and will not come off. Can you give me some advise on how to get it off.Reply
InyoPools Product Specialist Matt S. Posted: 4/21/2021
A strap wrench or channel locks are the best way to get the impeller off in one piece. If you cannot get it to budge, you may need to break off the impeller. If it comes to that, you can find a replacement impeller for your pump here, Hayward Power-Flo LX1580, 1520UN, 1680.Reply
AZ21 Posted: 4/9/2021
I recently had a leak coming from my shaft seal so I replaced it with a new one. When I started the motor up within seconds there was smoke coming through the pump basket. I took everything apart again and found the graphite seal was cracked and the ceramic one looked like the mechanical seal was rubbing against it with a lot of friction, also the seal plate that holds the ceramic seal looked a little melted and in worse condition then when I took it apart the first time. I've replaced many seals before so I'm quite positive I installed everything correctly. Any ideas on why or where this smoke is coming from? Was it a out of box bad seal maybe? I see a lot of people pointing to a bad motor but it doesn't seem to have any problems and also the smoke was from inside all the housing.Reply
InyoPools Product Specialist Matt S. Posted: 4/9/2021
Unless the shaft seal was defective out of the box, the only other thing I could think of is that part of the old shaft seal was still on the impeller. That could have caused some extra compression friction, leading to the failure. But that is just a guess on how a shaft seal could have caused this problem.Reply
Richard from Cumming GA Posted: 10/27/2020
Great video! Made my seal replacement a piece of cake! Can’t thank you enough!Reply
InyoPools Product Specialist Matt S. Posted: 11/3/2020
Awesome! Thanks for readingReply
William Posted: 10/20/2020
I brought a new Hayward replacemenpump, and I forgot to order the go-kit, and it started to leak. I ordered the go-kit and followed the instructions and now is working 100% thank you for the instructions they're very important. Thank uReply
InyoPools Product Specialist Matt S. Posted: 10/22/2020
You are very welcome. Thank you for reading!Reply
Peter DeSanto Posted: 8/1/2020
I just replaced my sp1607 pump with a v-grren pump. I got everything from you all and followed the video (very helpful!) for replacing everything. Now I'm getting a water leak from under the mounting plate. When I tighten the mounting bolts a bit more the leak stops. Does this suggest I may not have put the shaft seal on properly or just that I haven't sufficiently tightened the mounting plate bolts? All seals were replaced when I replaced the pump motor.Reply
InyoPools Product Specialist Matt S. Posted: 9/1/2020
There are only two gaskets that could cause a leak there, and that is the housing gasket or the shaft seal. I would break down the pump to make sure everything is installed correctly. While you have it apart, check for any cracks in the seal plate, just in case.Reply
Bobby Posted: 5/30/2020
Made the mistake of not removing all of the shaft seal. I was lost until I ran into this. Thank you so much for saving the day.Reply
InyoPools Product Specialist Matt S. Posted: 10/23/2020
You're welcome! Thanks for reading.Reply
Krystle Posted: 5/23/2020
This video was incredibly helpful. Thank you very much!Reply
Jorge RODRIGUEZ Posted: 7/15/2019
Changed shaft seal on Hayward super pump and still leaks what could it be.Reply
InyoPools Product Specialist Matt S. Posted: 7/15/2019
Either that shaft seal is not sitting correctly, or there is a crack in the seal plate. The seal plate is key 13, on this parts page Hayward Super Pump SP1600 & SP2600 SeriesReply
Jorge RODRIGUEZ Posted: 7/15/2019
Thank you I will check seal plate and will get back to you thank you againReply
CF Posted: 6/17/2019
WARNING: Make sure you remove the hex screw from the impeller before trying to unscrew it off the shaft. The steps above do not mention this but Hayward pumps/motors have a hex screw that is reverse threaded and locks the impeller in place. I sheered mine off thinking it came off with the impeller. It does not. You must unscrew it (turn it to the right, not the left) before unscrewing the impeller.Reply
Mike Posted: 6/15/2019
I replaced a Go-kit 1 in a Hayward Max flo pump and when I went to use it water was coming out of the bottom near the motor, I followed the video and did every thing right I believe, never touched the white part and just to be sure I wiped it with a clean cloth prior to assembly. What do you sugest? buy another kit and try again? Or can a I salvage what I got and try again?Reply
InyoPools Product Specialist Matt S. Posted: 6/20/2019
I would take the pump apart to check the housing gasket; if that seal got pinched when assembling the pump the leak can resemble a bad shaft seal.Reply
Alan Posted: 5/14/2019
I had a pump shaft seal go bad. I ran the pump a few hours with the seal leaking. I then replaced the seal, and now my pump is squealing when it runs. Do I need to replace the motor bearings and another shaft seal?Reply
InyoPools Product Specialist Robert M. Posted: 5/14/2019
Just to be safe, we would recommend replacing the shaft seal when you replace the bearings. The shaft seal you just installed may be ok but it would be a pain to rebuild the pump only to find out that it is leaking again.Reply
John Miller Posted: 4/10/2019
I did the replacement and when I put it back together, I forgot to add water to the basket. Within seconds I smelled burning. I opened the basket area, and smoke came out. The seal has failed and water is coming out the bottom. Is it because of the dry start or did I do something wrong on the installation?Reply
InyoPools Product Specialist Robert M. Posted: 4/10/2019
Thee pump running dry caused the seal to fail. Installing the seal incorrectly wouldn't have caused the pump to smoke.Reply
Eddie Posted: 2/5/2019
I absolutely cannot get the white ceramic seal with rubber ring to fit in. Seems like everyone else is not having a problem but mine is too tight to even start in the cavity. Why is mine not fitting?Reply